 |
| OWNERS
REGISTER |
| FEATURES
AND STORIES |
| ROAD
TESTS |
| FORUM |
WHERE
TO GET BITS FOR
THESE BIKES |
| GUZZI
EVENTS |
| OWNERS
REGISTER |
|
OWNERS
REGISTER
|
|
TECHNICAL
SPEC
|
| 750
RACING |
| GUZZI
AND DUCATI MUSEUMS |
| ITALIAN
BIKES SHOWS AND AUTOJUMBLES |
| POSTERS
AND LIERATURE |
| |
| |
| |
| |
| |
| |
| |
| |
| |
| |
| |
|
|
REWIRING
YOUR GUZZI
by
Euan McGlynn
No
need to be scared of wiring any longer!! Now you have
no excuse to have a wiring loom that's falling apart and
a Guzzi that leaves you stranded - many thanks to Euan
who has supplied this detailed and easy to follow feature
on rewiring your Guzzi
This
is a short article on renewing the wiring harness of your
Guzzi at a fraction of the dealer cost. If you have basic
DIY skills this is not beyond anyone. We will start with
tools, a decent soldering gun or iron, stripping tool,
side cutters, good quality solder and a multimeter are
all you will need. We all know Guzzi harnesses are not
the best of quality, cable available from specialist companies
is both of better quality and thinner wall structure.
You
can also improve on what was original equipment, this
will improve your charging circuit and we all know it's
pretty poor especially if you do a lot of town driving.
This article will give you cable sizes and suggest improvements
to ancillary equipment supplied by Bosch and CEV. However
we will start with the only items you will need a Guzzi
dealer to supply. As yet I have not found an alternative
supplier for these parts, the main plastic plugs that
locate in your headlamp (Fig1).
( click
on the thumbnails for a bigger picture)
|
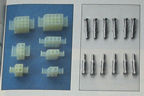
Fig.1
|
|
The
plugs and pins both male and female are available from
your dealership. All the Bosch and CEV plugs are available
from any good automotive electrical suppliers. Some of
you will want to stay original with your switchgear but
if you want to use your bike on a regular basis I would
suggest changing this, as it is easy to plug in and out
there is no reason you cannot have both. If you are showing
your bike you will want originality, this is coming from
a V7 sport owner who recently went back to original switches
for this very reason, they are crap! With the sport and
750S as they do not plug in and out too easily so this
is not an option. Incidentally any Sport owners reading
this I can supply original start switches, but have limited
quantities. Let's get on with the technical bit.
To
begin with you need to go to your local print shop and
have your wiring diagram blown up, this makes things far
easier to follow, you can use your old harness as a template
or measure it on a bare bike, when doing this the most
important measurement will be the outer PVC sleeving remember
to leave length for turning your bars!
Now
to cable type - there are a couple of choices here, you
will find cable comes in standard and thinwall insulation,
thinwall is far better for its overall weight and bulk.
Apart from the insulation you will also find that it comes
in different diameters for different amps carried this
is for different applications, charging circuit, ignition
circuit, lighting, general wiring.
|
|
16/0.20mm
11amps -
32/0.20mm
16.5 amps -
28/0.03mm
25amps -
44/0.30
33amps -
|
-
side and taillights, horns,
general wiring
- side, tail, horns, general wiring
.-
charging, ignition, battery feed
- charging, battery feed
|
To
improve your charging circuit I suggest you use 28/0.030
- these are the cables coming out of your alternator
(the three yellow wires). This should also be used for
your ignition circuit and starter, improves power to
starter.
For
your headlight use 32/0.20 and for the rest of your
wiring you can use 16/0.20. You can use 28/0.30 for
all of your wiring as the larger diameter of cable assists
the flow of power. I have also listed 44/0.30 this can
be used in place of 28/0.30. You will need 2m of each
colour, obviously you will need more of some colours
that have multiple uses i.e.: Yellow.
You
will also require PVC sleeving of different diameters,
12mm or 14mm for your main harness, 8mm for ancillary
harnesses, 6mm and 4.5mm. The large sizes you will need
2m of the smaller 3m.
I
also suggest you buy some heatshrink to terminate the
ends of your harness, you will need this in several
diameters. That is the wiring dealt with at the end
of this article you can find a list of cable colours
you will need. Remember this will have cost you a fraction
of dealer prices £90.00 for a main harness, as opposed
to about £30.00 which includes all the ancillary harnesses
as well as the main. The next purchase will be connectors,
these are the spade type female fitted to all Guzzis
at the fuse box end (Fig2).
|
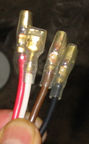
Fig.
2
|
| I
would advise against crimp type spades even with a good
crimping tool these are unreliable in regular use. I would
recommend solder type brass female blades 6.3mm, these come
to suit two cable diameters 1-2.5mm and 2.5-6mm you will
need both, you will also need blade insulators these are
the plastic covers for the spade. If you go for latch type
spades you can use them in your Bosch connectors this allows
them to lock in. Also required are flag spades and insulators
for your alternator connections (Fig3).
|
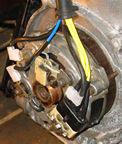
Fig.
3
|
|
For
the regulator/ rectifier if you are using standard equipment
you can buy new blank plugs from any good automotive electrical
dealer. Ring terminals, for earthing and battery connection,
bullet connectors for oil pressure switch, braking circuit
and indicators. There are lots of good miniature multi
connectors on the market have a look at your dealers,
good for back lights etc.
Now
to assembly - remember with wiring cleanliness is everything
and water is your enemy, this is why insulation is important,
good earth contacts, as most wiring problems are due to
earth faults, always check the continuity with a meter,
when you rewire do it all and don't scrimp, don't leave
those old cables on your coils, or those old HT leads,
or oxidised battery cables. These will all have an effect
on performance.
When
soldering make sure you silver all wires and connectors
before assembly this aids contact and will save you time,
don't rush and always measure twice before cutting any
cable, when making your main harness take all your cables
going up the sleeve and insert them into the pre-cut PVC.
It is easiest to terminate the 15-way connector first
and your fuse end will just be tails with no connectors
(at this stage don't forget to fit rubber boot to cover
15 way plug) once you have measured where these cables
go you can cut and terminate them.
It
is best to fit the individual pins first this makes soldering
easier, when you have fitted these you can then mate them
to the plug they do lock in so make sure they are in the
right holes, your wiring diagram has a key to this. You
will have to make some holes half way up your PVC sleeve
for the ignition switch, coils, oil pressure, horns, don't
cut this as it will tear later, burn a hole with your
soldering iron it seals the edges and stops tearing. It
is easier to fit the fifteen cables up the sleeve then
the four for your ignition, one for horn and one for oil
pressure. Don't forget take your time - lay out the harness
and think about what you are doing, it is easier to label
each cable colour, what it does and where it goes.
The design of the original harness does have some serious
drawbacks i.e.: everything plugging into your headlight
which gets the most water when travelling at speed (for
those of you that go out in the rain!) not much can be
done here without serious redesign, Vaseline or silicon
grease are the greatest help here. Some of the ancillaries
are none too clever, coils mounted in side panels, this
makes for extra long HT leads, and the coils can be easily
moved to under your tank (Fig4).
|
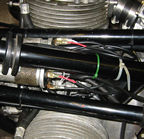
Fig.
4
|
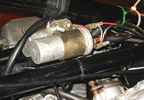
Fig. 4a
|
| The
regulator/rectifier, I would advise changing this for a
solid state combined unit, there are several choices here,
Bosch make their own fitted to later BMWs, Newtronic (which
I prefer) (Fig5), and Silent
Hektik |
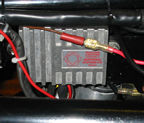
Fig.
5
|
| Not
only does this save space but also these units are far more
reliable the only drawback being some of them will not run
the charge light. Other areas worth looking at are electronic
ignition (Fig6, 6a) unit can
be mounted in old coil location, several manufactures make
this, again more reliable, but if it does go wrong you're
stranded!! |
Fig. 6
|
Fig.
6a
|
|
ELECTRICAL COMPONENTS - High output coils - manufacturers
such as Dyna Hall or Silent Hektek, you will also find most
modern bikes are fitted with them, just match up the Ohms
and voltage and you're in business. Don't forget Silicon
HT leads will make a difference to both standard and high
output coils. A lot of owners complain of lack of output
from their alternator, there is not much than can be done
here without major work, you can fit the newer Saprisa unit
employed by modern Guzzis or full digital charging by Silent
Hektek, but increasing cable size as suggested will help,
the problem is that at low revs the power output is just
not there. Starter motor can be replaced for the later Valeo
unit, which has a higher horsepower output than the Bosch,
it is also lighter, but if your bike and electrics are set
up right it should start second press. Switchgear as any
Guzzi owner knows can be a bit of an Achilles heel, there
are lots of alternatives both old and modern, Seventies
Yamaha combined lights/horn/indictors are very good and
alloy in construction the only draw back being no light
flasher (Fig7), just look around
and see what takes your fancy. |
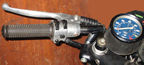
Fig.
7
|
| I
have recently discovered a good start/stop switch alternative,
made by Domino (Fig8) it goes
well with a Tomasselli throttle (Tomasselli are part of
Domino), you will find it fitted to the Aprilia RSV1000.
Equally Honda do a separate start/stop of good quality fitted
to most of their R series - Ebay can be a good source. |
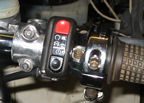
Fig.
8
|
|
TOOLS
AND MATERIALS
Most
manufacturers do combined throttle/start/stop so if you
fancy changing your switchgear don¹t forget to take this
into account when planning your layout. I hope this brief
article will be of some help, if you have basic mechanical
skills you can achieve this easily and improve your wiring
and general electrics. As with any mechanical task check
your work over test all your connections with a multimeter,
check all your earths and make sure they do go to earth,
most of the wiring problems I have seen with Guzzis are
due to corrosion. If you have to buy tools look for a
soldering iron with a fine tip this will make your joins
neater, multimeters can be bought quite cheaply, shop
around.
WIRING
COLOURS: Yellow, red, black, brown, green, grey, blue,
pink, white, orange, purple, green/black, blue/black,
red/black, white/black.
The photos hopefully will encourage you to make some improvements;
with a Guzzi any weight saved is a blessing so good luck.
I can only supply the name of one supplier for bulk electrical
goods in the UK but they are very good and I would highly
recommend them;
Vehicle
Wiring Products (Catalogue available). 9 Buxton Court,
Manners Industrial Estate, Ilkeston, Derbyshire, DE7 8EF
U.K.
Tel: 0115 930545 Fax: 01159440101
email:
sales@vehicleproducts.co.uk
MY
GUZZIS - As for the other parts you should know where
to get them i.e. any good Guzzi dealer. I hope the wiring
diagram is of help. I have owned Moto Guzzi¹s since 1978
when I bought my V7 sport when it was six years old, it
was imported into Scotland from America by a mate of mine
he¹s regretted it ever since. In 1979 I bought my four
year old burned out S3, this bike had been in a local
dealers and sat in his showroom for two years before it
was sold. I used to admire this bike but it was far more
expensive than the Triumph's on sale and I never had the
money, that's why I jumped at the chance to buy my V7
sport in '78. Little did I realise that the S3 would come
into my hands, the owner had an unfortunate dropping of
the bike and subsequent fire, and I still have a melted
Dellorto. I have since restored both, the V7 sport in
1980 and the S3 in 1983. At the moment of writing the
S3 is undergoing further work and I am also building an
1100 hybrid Tonti framed sport. The '72 V7 sport continues
to evolve the last addition being an optional Guzzi screen,
sourced by Teo Lammers in Nimegen Netherlands, he's a
bit of a Sport fan with more sports than I have ever seen
in the one place, his shop is well worth a visit. http://www.tlm.nl
|
|
|